Renault Clio: Catalytic pre-converter: Removal - Refitting
K9K, and 772

PARTS AND CONSUMABLES FOR THE REPAIR WORK
- Parts always to be replaced:
- the seal between the catalytic pre-converter and the turbocharger,
- the seal between the catalytic pre-converter and the flexible pipe.
- Consumables:
- abrasive pads,
- surface cleaner 77 01 404 178,
- clean cloths.
REMOVAL
I - REMOVAL PREPARATION OPERATION
- Position the vehicle on a two-post lift (see Vehicle: Towing and lifting) (MR 392, 02, Lifting equipment).
- Disconnect the battery (see Battery: Removal - Refitting) (MR 392, 80A, Battery).
- Remove:
- the engine cover,
- the scuttle panel grille (see Scuttle panel grille: Removal - Refitting) (MR 393, 56A, Exterior equipment),
- the scoop under the scuttle panel grille (see Scoop under the scuttle panel grille: Removal - Refitting) (MR 393, 56A, Exterior equipment).
- Disconnect the connector from the turbocharger upstream exhaust gas temperature sensor.
- Detach the turbocharger upstream exhaust gas temperature sensor connector from the timing end lifting eye.
- Remove:
- the bolts from the lifting eye, timing end,
- the lifting eye on the timing end.
II - OPERATION FOR REMOVAL OF PART CONCERNED
- Remove:
- the catalytic pre-converter nuts on the turbocharger,
- the engine undertray,
- the lower engine tie-bar (see 19D, Engine mounting, Lower engine tie-bar: Removal - Refitting, 19D-13).
- Remove:
- the connecting hose nuts on the catalytic pre-converter,

- Remove the bolt from the downstream stay on the catalytic pre-converter.
- Undo the downstream stay bolts on the cylinder block.
- Remove the catalytic pre-converter downstream stay.
- Remove the catalytic pre-converter upstream stay upper bolts.
- Undo the catalytic pre-converter upstream stay lower bolt.
- Remove the catalytic pre-converter upstream stay.
- Remove the catalytic pre-converter diesel injector cooler nuts.
- Discard the catalytic pre-converter diesel injector cooler seal.
- Remove the catalytic pre-converter by moving it towards the timing end and moving aside the catalytic pre-converter diesel injector cooler.
- Remove the catalytic pre-converter from the engine compartment by moving the engine towards the front of the vehicle.
- Remove:
- the seal between the catalytic pre-converter and the turbocharger,
- the seal between the catalytic pre-converter and the flexible pipe.
- Discard:
- the seal between the catalytic pre-converter and the turbocharger,
- the seal between the catalytic pre-converter and the flexible pipe.
REFITTING
I - REMOVAL PREPARATION OPERATION
- Using ABRASIVE PADS, clean the pressure faces:
- of the turbocharger and the catalytic pre-converter,
- of the catalytic pre-converter and the exhaust pipe.
- Next, degrease these pressure faces using SURFACE CLEANER AND CLEAN CLOTHS 77 01 404 178.
- If replacing, torque tighten:
- the catalytic pre-converter studs on the turbocharger (7 N.m),
- the turbocharger studs on the flexible pipe (7 N.m),
- the catalytic pre-converter diesel injector cooler studs (7 N.m).
II - REFITTING OPERATION FOR PART CONCERNED
- From underneath the vehicle, fit:
- the catalytic pre-converter fitted with a new seal between the catalytic pre-converter and the turbocharger,
- one of the catalytic pre-converter nuts on the turbocharger,
- the diesel injector cooler on the catalytic pre-converter,
- the diesel injector cooler nuts.
WARNING
Check that there is no contact between the catalytic pre-converter and the turbocharger oil return pipe during the entire catalytic pre-converter tightening operation.
- Torque tighten in order:
- the catalytic pre-converter upstream stay bolts on the engine,
- the catalytic pre-converter downstream stay bolt and nut on the gearbox,
- the catalytic pre-converter upstream stay bolts on the catalytic converter,
- the catalytic pre-converter downstream stay bolt on the catalytic converter,
- the catalytic pre-converter nuts on the turbocharger,
- the diesel injector cooler nuts.
- Torque tighten in order:
- the catalytic pre-converter nuts on the turbocharger (26 N.m),
- the catalytic pre-converter upstream stay bolts on the engine (44 N.m),
- the catalytic pre-converter downstream stay bolt and nut on the gearbox (21 N.m),
- the catalytic pre-converter upstream stay bolts on the catalytic pre-converter (26 N.m),
- the catalytic pre-converter downstream stay bolt on the catalytic pre-converter (21 N.m),
- the diesel injector cooler nuts (25 N.m).
- Refit a new seal between the catalytic pre-converter and the flexible pipe on the catalytic pre-converter.
- Position the connecting hose on the catalytic pre-converter.
- Refit the flexible pipe nuts on the catalytic pre-converter.
- Torque tighten the flexible pipe nuts on the catalytic pre-converter (21 N.m).
III - FINAL OPERATION
- Refit the lower engine tie-bar (see 19D, Engine mounting, Lower engine tie-bar: Removal - Refitting, 19D-13).
- Refit:
- the lifting eye on the timing end,
- the timing end lifting eye bolts.
- Clip the turbocharger upstream exhaust gas temperature sensor connector on the timing end lifting eye.
- Connect the turbocharger upstream exhaust gas temperature sensor connector.
- Refit:
- the scoop under the scuttle panel grille (see Scoop under the scuttle panel grille: Removal - Refitting) (MR 393, 56A, Exterior equipment),
- the scuttle panel grille (see Scuttle panel grille: Removal - Refitting) (MR 393, 56A, Exterior equipment),
- the engine cover.
- Connect the battery (see Battery: Removal - Refitting) (MR 392, 80A, Battery).
- Refit the engine undertray.
D4F, and 784
REMOVAL
REMOVAL PREPARATION OPERATION
- Position the vehicle on a two-post lift (see Vehicle: Towing and lifting) (MR 392, 02A, Lifting equipment).
- Disconnect the battery (see Battery: Removal - Refitting) (MR 392, 80A, Battery).
- Remove:
- the engine protector,
- the engine cover.
- Drain the gearbox (see Manual gearbox oils: Draining - Filling) (MR 392, 21A, Manual gearbox).

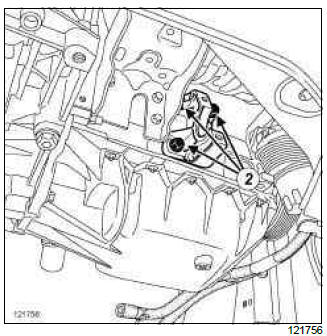
- Remove the nuts (1) from the exhaust bracket at the outlet of the catalytic pre-converter.
- Remove:
- the front right-hand driveshaft (see 29A, Driveshafts, Front right-hand driveshaft: Removal - Refitting),
- the front right-hand wheel driveshaft bearing nuts (2),
- the front right-hand wheel driveshaft bearing.

- Disconnect the catalytic pre-converter upstream oxygen sensor connector (3).
- Unclip the catalytic pre-converter upstream oxygen sensor connector.
- Detach the catalytic pre-converter upstream oxygen sensor wiring harness at (4).
- Remove:
- the bolts (5) from the turbocharger heat shield,
- the turbocharger heat shield.

- Disconnect the catalytic pre-converter downstream oxygen sensor connector (6).
- Unclip the catalytic pre-converter downstream oxygen sensor connector.
- Detach the catalytic pre-converter downstream oxygen sensor wiring harness at (7).

- Remove:
- the nut (8) from the turbocharger strut,
- the bolt (9) from the turbocharger strut,
- the turbocharger strut.

- Disconnect the oil pressure sensor connector.
- Undo the bolts (10) on the catalytic pre-converter primary strut.
- Remove:
- the catalytic pre-converter upstream strut bolts (11),
- the catalytic pre-converter upstream stay,
- the bolts (12) from the catalytic pre-converter primary strut,
- the primary strut on the catalytic pre-converter.
READ NEXT:
 Catalytic converter: Removal - Refitting
K4J or K4M
IMPORTANT
Catalytic converters contain ceramic fibres: these
are contained within a closed unit, and cannot disperse.
Cutting or drilling catalytic converters is prohibited.
REMOVAL
I - R
Expansion chamber: Removal - Refitting
REMOVAL
I - REMOVAL PREPARATION OPERATION
Position the vehicle on a two-post lift (see Vehicle:
Towing and lifting) (MR 392, 02, Lifting equipment).
Remove the engine undertray.
Cut the exhaust
Intermediate pipe: Removal - Refitting
REMOVAL
I - REMOVAL PREPARATION OPERATION
Position the vehicle on a two-post lift (see Vehicle:
Towing and lifting) (MR 392, 02A, Lifting equipment).
II - OPERATION FOR REMOVAL OF PART
CONCERNED
SEE MORE:
Headlight bulb: Removal - Refitting
DOCUMENTATION PHASE 1
REMOVAL
DISCHARGE LAMPS
IMPORTANT
To prevent eye injuries:
do not look at a xenon bulb when lit (voltage
when lit 20000 V),
do not light a bulb which has not been fitted into
its headlight.
IMPORTANT
To prevent burns, wait until the " computers -
power unit " assemblies a
Automatic gearbox: Removal - Refitting
K4M, and DP0
REMOVAL
I - REMOVAL PREPARATION OPERATION
Position the vehicle on a two-post lift (see Vehicle:
Towing and lifting) (02A, Lifting equipment).
Remove:
the engine undertray,
the front wheels (see Wheel: Removal - Refitting)
(35A, Wheels and tyres),
the front wheel arch liners
© 2016-2025 Copyright Renault Clio Owners Club
