Renault Clio: Front bumper: Stripping - Rebuilding
EQUIPMENT LEVEL EA1 or EQUIPMENT LEVEL EA2 or EQUIPMENT LEVEL EA3 or EQUIPMENT LEVEL EA4 or EQUIPMENT LEVEL EA5, and DOCUMENTATION PHASE 1
STRIPPING
I - STRIPPING PREPARATION OPERATION
- Remove the front bumper (see 55A, Exterior protection, Front bumper: Removal - Refitting, 55A-1).
II - STRIPPING OPERATION FOR PART CONCERNED

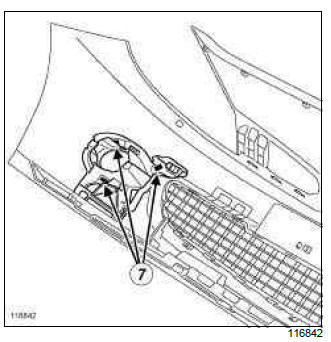
- Remove the bolts (1).
- Disconnect the connectors (2).
- Remove the fog lights.
- Note the wiring harness position.
- Remove the wiring harness.

- Unclip the clips (3).
- Remove the headlight washer jets (depending on the equipment level).
- Note the position of the headlight washer jet pipes (depending on equipment level).

- Unclip the clips (4).

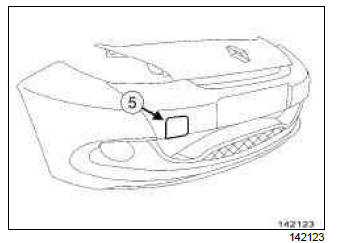
- Unclip the impact strips (5).

- Unclip:
- the clips (6),
- the fog light supports.

- Remove:
- the bolts (7),
- the front badge.
hot climate vehicle

- Unclip the stone guard grille.

- Unclip the absorber (8).

- Unclip the stiffener.

- Unclip the radiator half-grilles (9).
- Remove the radiator half-grilles.
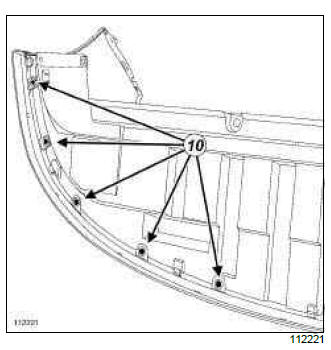
- Drill out rivets (10).
- Remove the sump.
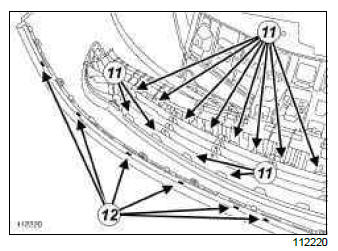
- Unclip the clips (11).
- Remove the front bumper bottom grille.
- Unclip the clips (12).
- Remove the lower trim.
REBUILDING
I - REBUILDING OPERATION FOR PART CONCERNED

- Position the lower trim strip.
- Drill a hole at the position (13) of each of the clips using a 4.5 mm drill bit.
- Rivet the lower trim.
- Refit the lower cover.
- Insert rivets into the lower cover.
- Clip in the lower grille.
- Refit the fog light supports.
- Clip on:
- the clips (6),
- the impact strips,
- the radiator half-grilles,
- the stiffener,
- the absorber,
- the stone guard grille (hot climate vehicle).
- Refit:
- the front badge,
- the bolts (7),
- the headlight washer jets (depending on the equipment level),
- the clips (3) (depending on the equipment level),
- the headlight washer jet pipes (depending on the equipment level),
- the fog light wiring harness (depending on the equipment level),
- the fog lights (depending on the equipment level),
- the bolts (1).
- Connect the connectors.
II - FINAL OPERATION.
- Refit the front bumper (see 55A, Exterior protection, Front bumper: Removal - Refitting, 55A-1).
EQUIPMENT LEVEL SPORT, and DOCUMENTATION PHASE 1
STRIPPING
I - STRIPPING PREPARATION OPERATION
- Remove the front bumper (see 55A, Exterior protection, Front bumper: Removal - Refitting, 55A-1).
II - STRIPPING OPERATION FOR PART CONCERNED

- Remove the bolts (1).
- Disconnect the connectors (2).
- Remove the fog lights.
- Note the wiring harness position.
- Remove the wiring harness.

- Unclip the clips (3).
- Remove the headlight washer jets.
- Store the position of the headlight washer pipes.

- Remove the bolts (4).
- Remove the front badge.

- Unclip the absorber (5).

- Unclip the stiffener.

- Unclip the radiator half-grilles (6).
- Remove the radiator half-grilles.
- Unclip:
- the clips (7),
- the fog light supports.

- Unclip the clips.
- Remove the lower grille (8).

- Unclip the lower trim piece.

- Drill out the rivets (9).
- Remove the sump.
REBUILDING
I - REBUILDING OPERATION FOR PART CONCERNED
- Refit and rivet the lower cover.

- Clip:
- the lower trim strip starting with the centre of the part (10),
- the lower grille.
- Refit the fog light supports.
- Clip:
- the clips (7),
- the radiator half-grilles,
- the stiffener,
- the absorber.
- Refit:
- the front badge,
- the bolts (4),
- the headlight washer jets,
- the clips (3),
- the fog light wiring harness,
- the fog lights,
- the bolts (1).
- Connect the connectors.
II - FINAL OPERATION
- Refit the front bumper (see 55A, Exterior protection, Front bumper: Removal - Refitting, 55A-1).
EQUIPMENT LEVEL EAG

STRIPPING
I - STRIPPING PREPARATION OPERATION
- Position the vehicle on a two-post lift (see Vehicle: Towing and lifting) (02A, Lifting equipment).
- Remove:
- the front wheels (see Wheel: Removal - Refitting) (35A, Wheels and tyres),
- the front wheel arch liners (see 55A, Exterior protection, Front wheel arch liner: Removal - Refitting, 55A-41),
- the front bumper (see 55A, Exterior protection, Front bumper: Removal - Refitting, 55A-1).
II - STRIPPING OPERATION FOR PART CONCERNED
- Remove:
- the front bumper wiring (see Front bumper wiring: Removal - Refitting) (88A, Wiring),
- the front fog lights (see Front fog light: Removal - Refitting) (80B, Headlights).
HEADLIGHT WASHERS WITH BLADE
- Remove the headlight washer jets (see Headlight washer jet: Removal - Refitting) (85A, Wiping - Washing).
- Mark the position of the headlight washer jet pipe on the front bumper.
- Remove the headlight washer jet pipe from the front bumper.

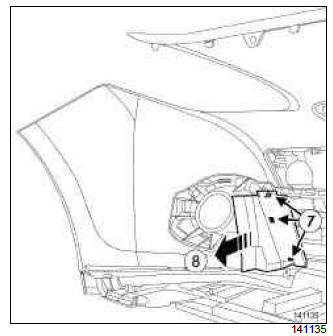
- Unclip the absorber at (1) by pressing the clips (2).
- Remove the absorber.

- Remove the front badge bolts (3).
- Cut the front bumper clips (4).
- Unclip:
- the front badge,
- the stiffener by pressing the clips (5).

- Unclip the blanking covers by pressing the clips (6).
- Remove the blanking covers at (7).

- Unclip the impact strips by pressing the clips.
- Remove the impact strips from the front of the front bumper, starting with the side impact strips.

- Drill the rivets out.
- Remove the diffuser (8).

- Remove:
- the front fog light mounting clips (9),
- the front fog light mountings at (10).

- Unclip the upper radiator grille by pressing the clips.
- Remove the upper radiator grille at (11).

- Unclip the lower radiator grille by pressing the clips.
- Remove the lower radiator grille at (12).

- Remove the bolts (13) from the side spoilers.

- Drill out the rivets (14).
- Remove the centre spoiler (15).

- Drill out the rivets of the side spoilers (16).
- Remove:
- the side spoilers (17),
- the side spoiler mountings.

- Drill out the rivets (18).
- Remove the centre spoiler mounting at (19).
REBUILDING
I - REBUILDING PREPARATION OPERATION
- parts always to be replaced: front bumper rivet (50,05,02,18).
- parts always to be replaced: Front bumper clip (50,05,02,17).
- Check the clips of the front fog light mountings, and replace them if necessary.
II - REBUILDING OPERATION FOR PART CONCERNED
- Refit and rivet the centre spoiler mounting using the rivet gun.
- Refit the side spoiler mountings.
- Refit and rivet using the rivet gun :
- the side spoilers,
- the centre spoiler.
- Clip:
- the lower radiator grille,
- the upper radiator grille.
- Refit the front fog light mountings.
- Refit and rivet the diffuser using the rivet gun.
- Clip:
- the impact strips on the front bumper,
- the blanking covers,
- the stiffener,
- the front badge.
- Attach the stiffener using new front bumper clips.
- Refit the front badge bolts.
- Clip the absorber into place.
HEADLIGHT WASHERS WITH BLADE
- Refit:
- the headlight washer jet pipe on the bumper as marked before removal,
- the headlight washer jets (see Headlight washer jet: Removal - Refitting) (85A, Wiping - Washing).
- Refit:
- the front fog lights (see Front fog light: Removal - Refitting) (80B, Headlights),
- the front bumper wiring (see Front bumper wiring: Removal - Refitting) (88A, Wiring).
III - FINAL OPERATION
- Refit:
- the front bumper (see 55A, Exterior protection, Front bumper: Removal - Refitting, 55A-1),
- the front wheel arch liners (see 55A, Exterior protection, Front wheel arch liner: Removal - Refitting, 55A-41),
- the front wheels (see Wheel: Removal - Refitting) (35A, Wheels and tyres).
EQUIPMENT LEVEL E3 LEISURE or EQUIPMENT LEVEL EA1 or EQUIPMENT LEVEL EA2 or EQUIPMENT LEVEL EA3 or EQUIPMENT LEVEL EA5, and DOCUMENTATION PHASE 2
STRIPPING
I - STRIPPING PREPARATION OPERATION
- Position the vehicle on a two-post lift (see Vehicle: Towing and lifting) (02A, Lifting equipment).
- Remove:
- the front wheels (see Wheel: Removal - Refitting) (35A, Wheels and tyres),
- the front wheel arch liners (see 55A, Exterior protection, Front wheel arch liner: Removal - Refitting, 55A-41),
- the front bumper (see 55A, Exterior protection, Front bumper: Removal - Refitting, 55A-1).
II - STRIPPING OPERATION FOR PART CONCERNED
FOG LIGHTS
- Remove:
- the front bumper wiring (see Front bumper wiring: Removal - Refitting) (88A, Wiring),
- the front fog lights (see Front fog light: Removal - Refitting) (85A, Wiping - Washing).
FOG LIGHTS, and HEADLIGHT WASHERS WITH BLADE
- Remove the headlight washer jets (see Headlight washer jet: Removal - Refitting) (80B, Headlights).
- Mark the position of the headlight washer jet pipe on the front bumper.
- Remove the headlight washer jet pipe from the front bumper.
EQUIPMENT LEVEL E3 LEISURE or EQUIPMENT LEVEL EA3 or EQUIPMENT LEVEL EA5

- Detach the lower centre trim piece from the front bumper at (1).

- Unclip (2) the absorber by pressing the clips (3).

- Remove the bolts (4).
- Cut the front bumper clips (5).
- Unclip:
- the front badge,
- the stiffener by pressing the clips (6).
- Unclip the blanking covers by pressing the clips (7).
- Remove the blanking covers at (8).

- Unclip the impact strips by pressing the clips.
- Remove the impact strips from the front of the front bumper, starting with the side impact strips.

- Drill the rivets out.
- Remove the diffuser (9).

- Remove:
- the clips (10),
- the front fog light trims (11).
FOG LIGHTS

- Remove:
- the clips (10),
- the front fog light mountings (12).

- Unclip the upper grille by pressing the clips.
- Remove the upper grille at (13).

- Unclip the centre grille by pressing the clips.
- Remove the centre grille at (14).

- Remove:
- the spoiler clips,
- the spoiler (15).
REBUILDING
I - REBUILDING PREPARATION OPERATION
- parts always to be replaced: front bumper rivet (50,05,02,18).
- parts always to be replaced: Front bumper clip (50,05,02,17).
EQUIPMENT LEVEL E3 LEISURE or EQUIPMENT LEVEL EA3 or EQUIPMENT LEVEL EA5
- parts always to be replaced: Front bumper trim (50,05,02,08).
- Use a LINT-FREE CLOTH with HEPTANE (see Vehicle: Parts and consumables for the repair) (04B, Consumables - Products) to clean the part of the front bumper in contact with the lower centre trim piece.
- Use a clean and dry LINT-FREE CLOTH (see Vehicle: Parts and consumables for the repair) (04B, Consumables - Products) to wipe the part of the front bumper in contact with the lower centre trim piece.
- Check the clips of the front fog light trims, and replace them if necessary.
FOG LIGHTS
- Check the clips of the front fog light mountings, and replace them if necessary.
II - REBUILDING THE PART CONCERNED
- Position the spoiler.
- Drill a hole at the position of each clip using a 4.5 mm drill bit.
- Rivet the spoiler.
- Clip:
- the lower radiator grille,
- the upper radiator grille.
FOG LIGHTS
- Refit the front fog light mountings.
- Refit the front fog light trims.
- Refit and rivet the diffuser.
- Clip:
- the impact strips,
- the blanking covers,
- the stiffener,
- the front badge.
- Attach the stiffener using new front bumper clips.
- Refit the front badge bolts.
- Clip the absorber into place.
EQUIPMENT LEVEL E3 LEISURE or EQUIPMENT LEVEL EA3 or EQUIPMENT LEVEL EA5
- Bond a new lower centre trim piece on the front bumper.
FOG LIGHTS, and HEADLIGHT WASHERS WITH BLADE
- Refit:
- the headlight washer jet pipe on the front bumper as marked during removal,
- the headlight washer jets (see Headlight washer jet: Removal - Refitting) (85A, Wiping - Washing).
FOG LIGHTS
- Refit:
- the front fog lights (see Front fog light: Removal - Refitting) (80B, Headlights).
- the front bumper wiring (see Front bumper wiring: Removal - Refitting) (88A, Wiring).
III - FINAL OPERATION
- Refit:
- the front bumper (see 55A, Exterior protection, Front bumper: Removal - Refitting, 55A-1),
- the front wheel arch liners (see 55A, Exterior protection, Front wheel arch liner: Removal - Refitting, 55A-41),
- the front wheels (see Wheel: Removal - Refitting) (35A, Wheels and tyres).
EQUIPMENT LEVEL EAC or EQUIPMENT LEVEL SPORT, and DOCUMENTATION PHASE 2

STRIPPING
I - STRIPPING PREPARATION OPERATION
- Position the vehicle on a two-post lift (see Vehicle: Towing and lifting) (02A, Lifting equipment).
- Remove:
- the front wheels (see Wheel: Removal - Refitting) (35A, Wheels and tyres),
- the front wheel arch liners (see 55A, Exterior protection, Front wheel arch liner: Removal - Refitting, 55A-41),
- the front bumper (see 55A, Exterior protection, Front bumper: Removal - Refitting, 55A-1).
II - STRIPPING OPERATION FOR PART CONCERNED
FOG LIGHTS
- Remove:
- the front bumper wiring (see Front bumper wiring: Removal - Refitting) (88A, Wiring),
- the front fog lights (see Front fog light: Removal - Refitting) (80B, Headlights).
HEADLIGHT WASHERS WITH BLADE
- Remove the headlight washer jets (see Headlight washer jet: Removal - Refitting) (85A, Wiping - Washing).
- Mark the position of the headlight washer jet pipe on the front bumper.
- Remove the headlight washer jet pipe from the front bumper.

- Unclip the absorber (1) by pressing on the clips (2).
WITHOUT ADDITIONAL HEADLIGHTS

- Unclip the front fog light trims by pressing on the clips (3).

- Remove the front fog light trims at (4).
- Unclip the tow eye flap (5).

- Remove the tow eye flap.

- Remove:
- the bolts (6),
- the front badge.

- Unclip the stiffener.

- Drill the rivets out.
- Remove the diffuser (7).

- Drill the rivets out.
- Remove the aerodynamic fins (8).

- Remove the bolts.
- Unclip the centre grille (9).

- Remove:
- the bolts,
- the centre trim of the front bumper (10).

- Drill the rivets out.
- Remove:
- the pins,
- the upper trim of the front bumper (11).
REBUILDING
I - REBUILDING PREPARATION OPERATION
- parts always to be replaced: front bumper rivet (50,05,02,18).
II - REBUILDING OPERATION FOR PART CONCERNED
- Refit and rivet the upper trim of the front bumper using a rivet gun.
- Refit the front bumper centre trim.
- Clip on the centre grille.
- Refit and rivet using a rivet gun :
- the aerodynamic fins,
- the diffuser.
- Clip on the stiffener.
- Refit:
- the front badge,
- the tow eye flap.
WITHOUT ADDITIONAL HEADLIGHTS
- Refit the fog light trims (4).
- Refit the absorber (1).
HEADLIGHT WASHERS WITH BLADE
- Refit:
- the headlight washer jet pipe on the front bumper,
- the headlight washer jets (see Headlight washer jet: Removal - Refitting) (85A, Wiping - Washing).
FOG LIGHTS
- Refit:
- the front fog lights (see Front fog light: Removal - Refitting) (80B, Headlights),
- the front bumper wiring (see Front bumper wiring: Removal - Refitting) (88A, Wiring).
III - FINAL OPERATION
- Refit:
- the front bumper (see 55A, Exterior protection, Front bumper: Removal - Refitting, 55A-1)
- the front wheel arch liners (see 55A, Exterior protection, Front wheel arch liner: Removal - Refitting, 55A-41),
- the front wheels (see Wheel: Removal - Refitting) (35A, Wheels and tyres).
READ NEXT:
 Rear bumper: Removal - Refitting
EQUIPMENT LEVEL EA1 or EQUIPMENT LEVEL EA2 or EQUIPMENT LEVEL EA3 or
EQUIPMENT LEVEL EA4
or EQUIPMENT LEVEL EA5, and DOCUMENTATION PHASE 1 - EQUIPMENT LEVEL E3 LEISURE
or
EQUIPMENT LEVEL EA1 or EQUI
Aerodynamic diffuser: Removal - Refitting
EQUIPMENT LEVEL EAC or EQUIPMENT LEVEL SPORT
REMOVAL
I - REMOVAL PREPARATION OPERATION
Position the vehicle on a two-post lift (see Vehicle:
Towing and lifting) (02A, Lifting equipment).
II - OPER
Front side door protective strip: Removal - Refitting
REMOVAL
I - REMOVAL PREPARATION OPERATION
Unclip the blanking cover (1).
Remove the bolt.
Remove the side mounted indicator (2) using a small
flat screwdriver.
Disconnect the power supply co
SEE MORE:
Locking, unlocking the opening elements
Locking/Unlocking the doors
from the outside
This is done using the RENAULT Card;
see the “RENAULT Card” information in
Section 1.
In certain cases, the RENAULT card
may not work:
if the RENAULT card battery is weak,
flat, etc.
if equipment operating on the same
frequency as th
Towing, attachments
Permissible nose weight, maximum
permissible towing weight,
braked and unbraked: refer to
the information on “Weights” in
Section 6.
For fitting and conditions of use,
refer to the equipment’s fitting instructions.
Please keep these instructions with
the rest
