Renault Clio: K9K, and JH3 or JR5 - K9K, and 772, and TL4

REMOVAL
I - REMOVAL PREPARATION OPERATION
- Position the vehicle on a two-post lift (see Vehicle: Towing and lifting) (MR 392, 02A, Lifting equipment).
WARNING
During this operation, secure the vehicle to the lift with a safety strap(s), to prevent it from becoming unbalanced.
- To fit the strap to the vehicle (see Vehicle: Towing and lifting) (MR 392, 02A, Lifting equipment).
- Remove the front engine cover.

- Remove:
- the scuttle panel grille (1) (see Scuttle panel grille: Removal - Refitting) (MR 393, 56A, Exterior equipment),
- the scoop under the scuttle panel grille.
- Remove the battery (see Battery: Removal - Refitting) (MR 392, 80A, Battery)

- Unclip the power supply fuse board support at (2).
- Move the support from the fuse board as indicated by the arrows.

- Remove the shielding by unclipping at (3).
- Disconnect the air flow sensor connector.

- Loosen the air inlet duct clip on the air filter unit.
- Remove:
- the air filter unit,
- the battery tray base.

- Loosen the mounting nut of the air pipe at the intercooler inlet on the alternator.
- Remove the air duct bolt on the rocker cover.
- Move the air duct clips to one side of the turbocharger and the air pipe at the intercooler inlet.
- Unclip the air duct (4) on the turbocharger and the air pipe at the intercooler inlet.
- Disconnect the connector (5) from the inlet air pressure sensor.
- Loosen the air inlet duct clip (6).
- Remove the front wheel arch liners (see Front wheel arch liner: Removal - Refitting) (MR 393, 55A, Exterior protection).
- Remove the front bumper (see Front bumper: Removal - Refitting) (MR 393, 55A, Exterior protection).

- Remove the air duct clips on the intercooler.
- Pull the tab and lift the intercooler from its mounting studs.
- Remove:
- the intercooler,
- the nut from the air pipes on the alternator,
- the turbocharging air ducts.
- Drain:
- the cooling circuit through the radiator bottom hose,
- the gearbox,
- the engine, if necessary.
- Drain the coolant circuit using the refrigerant charging station.
- Remove the " hub carrier - left-hand driveshaft " assembly (see Hub carrier - driveshaft assembly: Removal - Refitting) (MR 392, 31A, Front axle component).
- Remove the " hub carrier - right-hand driveshaft " assembly (see Hub carrier - driveshaft assembly: Removal - Refitting) (MR 392, 31A, Front axle component).
- Check the condition of the lip seal contact surface.
- Disconnect:
- the engine cooling fan assembly connectors,
- the top hose on the cylinder head coolant outlet unit,
- the passenger compartment heater hoses.

- Extract the expansion bottle from its housing by following the direction of the arrow and put it to one side.

- Disconnect the pressure switch connector on the condenser.
- Remove the bolts (7) from the air conditioning pipes.
Note: Plugs must be fitted on the hoses to prevent moisture from entering the system.

- Remove:
- the left-hand side stiffener bolts (8),
- the left-hand side stiffener,
- the lower bolt (9) from the side tie rods.
K9K, and 772, and TL4

- Remove:
- the bolt (1) mounting the earth on the coolant pump and the heating element unit support,
- the bolt (2) mounting the coolant pump and the heating element unit support on the radiator mounting cross member.
- Disconnect the connector (3) from the heating element unit.

- Remove:
- the front cross member bolts (10),
- the front radiator cross member,
- the cooling radiator assembly,
- the earth wiring.
- Disconnect:
- the preheating unit connector.
- the coolant temperature sensor.
DELPHI injection

SIEMENS injection

- Disconnect the fuel supply and return pipes on the high-pressure pump (11).
- Move the engine wiring harness to one side.
- Remove the Protection and Switching Unit cover.

- Disconnect:
- the Protection and Switching Unit connectors,
- the brake servo pipe,
- the 30A and 70A engine fuses,
- the fuse holder on the fuse board,
- the feed wiring on the fuse board,
- the feed wiring on the battery protection fuse box.
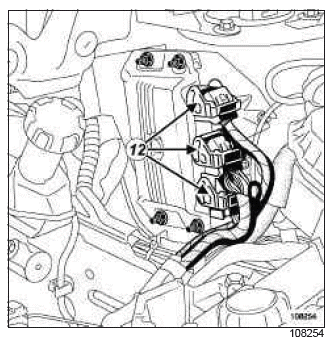
- Disconnect the injection computer connectors (12).

- Remove:
- the gear control cables on the gearbox by pushing at (13),
- the gear control cables from the sleeve stops by pressing at (14),
- the wiring harness channel mountings on the gearbox.

- Remove:
- the engine tie-bar,
- the exhaust downpipe bolts.
- Drain the brake fluid reservoir down to the clutch master cylinder pipe union using a syringe.

- Remove the clip at the wheel end (15).
- Disconnect the clutch pipe from the clutch slave cylinder.
- Support the engine and gearbox assembly on (Mot.1390).
- Mark the positions of the suspended engine mountings on the body.
- Remove:
- the suspended engine mounting,
- the gearbox support rubber pad,
- the gearbox suspended engine mounting.
K9K, and 772, and TL4
- Disconnect the fuel supply union from the diesel injector on the catalytic pre-converter.
II - REMOVAL OF PART CONCERNED
- Raise the vehicle, moving the engine towards the front.

- Extract the engine and gearbox assembly from the engine compartment.
REFITTING
I - REFITTING PREPARATION OPERATION
- For standard engine replacements (see ) (Technical Note 6006A, 10A, Engine and peripherals).
II - REFITTING PART CONCERNED

- Refit the engine and gearbox assembly in the engine compartment.
III - FINAL OPERATION.
K9K, and 772, and TL4
- Connect the fuel supply union to the diesel injector on the catalytic pre-converter.
- Refit:
- the gearbox suspended engine mounting,
- the gearbox support rubber pad,
- the suspended engine mounting.
- Remove the (Mot. 1390).
- Torque tighten:
- the bolts for the gearbox suspended mounting (62 Nm),
- the bolts for the suspended engine mounting on the engine (62 Nm),
- the bolts for the suspended engine mounting on the body (62 Nm).
- Connect the clutch pipe.
- Bleed the clutch system.
- Refit the exhaust downpipe bolts.
- Refit the lower engine tie-bar.
- Tighten to torque the engine tie-bar bolts (105 Nm).
- Refit the gear control cables.
- Reconnect:
- the connectors to the injection computer,
- the feed wiring on the battery protection fuse box,
- the feed wiring on the fuse board,
- the fuse holder on the fuse board,
- the 30A and 70A engine fuses,
- the brake servo pipe,
- the Protection and Switching Unit connectors.
- Refit the Protection and Switching Unit cover.
- Refit the engine wiring harness.
- Connect the fuel supply and return pipes on the high-pressure pump.
- Connect:
- the coolant temperature sensor,
- the preheating unit connector.
- the earth wiring.
- Refit:
- the cooling radiator assembly,
- the front radiator cross member,
- the front cross member bolts.
- Tighten to torque the front cross member bolts (105 Nm).
K9K, and 772, and TL4
- Refit:
- the bolt mounting the earth on the coolant pump and heating element unit support,
- the bolt mounting the coolant pump and heating element unit support on the radiator mounting cross member.
- Connect the connector to the heating element unit.
- Refit:
- the side tie-rod lower bolts,
- the left-hand side stiffener,
- the air conditioning pipes.
- Tighten to torque the air conditioning pipe bolts (8 Nm).
- Connect the pressure switch connector to the condenser.
- Refit the expansion bottle.
- Connect:
- the passenger compartment heater hoses,
- the top hose on the cylinder head coolant outlet unit,
- the radiator bottom hose,
- the fan assembly connectors.
- Always replace the differential output lip seal each time the driveshaft is removed (see Differential output seal: Removal - Refitting) (MR 392, 21A, Manual gearbox).
- Refit the " hub carrier - right-hand driveshaft " assembly (see Hub carrier - driveshaft assembly: Removal - Refitting) (MR 392, 31A, Front axle component).
- Refit the " hub carrier - left-hand driveshaft " assembly (see Hub carrier - driveshaft assembly: Removal - Refitting) (MR 392, 31A, Front axle component).
- Refit:
- the turbocharging pipes,
- the nut to the turbocharger pipes on the alternator,
- the intercooler.
- Refit the front bumper (see Front bumper: Removal - Refitting) (MR 393, 55A, Exterior protection).
- Refit the front wheel arch liners (see Front wheel arch liner: Removal - Refitting) (MR 393, 55A, Exterior protection).
- Refit the inlet pipe to the inlet manifold.
- Connect the inlet air pressure sensor
- Fit the air duct between the turbocharger and the intercooler air inlet pipe.
- Clip the air duct on the turbocharger and the air pipe at the intercooler inlet.
- Refit the air duct bolt on the rocker cover.
- Torque tighten the nut mounting the intercooler air inlet pipe on the alternator (8 Nm).
- refit:
- the battery tray base,
- the air filter unit.
- Refit the air inlet duct to the air filter unit and tighten the clip.
- Refit the battery protective tray.
- Refit the fuse board.
- Perform the following operations:
- refill the refrigerant circuit using the refrigerant charging station,
- refill the engine if necessary,
- refill the gearbox,
- refill the cooling system (see 19A, Cooling, Cooling system: Draining - Refilling, 19A-16).
- Bleed the cooling system.
- Connect the battery (see Battery: Removal - Refitting) (MR 392, 80A, Battery).
- Refit:
- the scoop under the scuttle panel grille (see Scoop under the scuttle panel grille: Removal - Refitting) (MR 393, 56A, Exterior equipment),
- the scuttle panel grille (see Scuttle panel grille: Removal - Refitting) (MR 393, 56A, Exterior equipment),
- the engine cover.
READ NEXT:
 D4F, and 740 or 742 or 764
REMOVAL
I - REMOVAL PREPARATION OPERATION
Position the vehicle on a two-post lift (see Vehicle: Towing and
lifting).
IMPORTANT
During this operation, secure the vehicle to the
lift with a strap
M4R, and DP0
REMOVAL
I - REMOVAL PREPARATION OPERATION
Position the vehicle on a two-post lift (see Vehicle:
Towing and lifting) (MR 392, 02A, Lifting equipment).
IMPORTANT
During this operation, secure the
F4R
REMOVAL
I - REMOVAL PREPARATION OPERATION
Position the vehicle on a two-post lift (see Vehicle:
Towing and lifting) (MR 392, 02A, Lifting equipment).
IMPORTANT
During this operation, secure the
SEE MORE:
Intermediate pipe: Removal - Refitting
REMOVAL
I - REMOVAL PREPARATION OPERATION
Position the vehicle on a two-post lift (see Vehicle:
Towing and lifting) (MR 392, 02A, Lifting equipment).
II - OPERATION FOR REMOVAL OF PART
CONCERNED
Cut the exhaust pipe (see 19B, Exhaust, Exhaust:
Precautions for the repair, 19B-19) (see )
(MR
Engine identification plate
Please quote the information on the
engine plate or label A in all correspondence
or orders.
(Location varies depending on engine)
Engine type.
Engine suffix.
Engine number.
© 2016-2025 Copyright Renault Clio Owners Club
