Renault Clio: Steering column adjustment handle: Removal - Refitting
REMOVAL
I - REMOVAL PREPARATION OPERATION
- Disconnect the battery (see Battery: Removal - Refitting).

- Remove:
- the mounting clips (1) on the lower trim of the driver's side dashboard,
- the lower trim (2) of the driver's side dashboard.
- Remove:
- the bolt-cover protective strip,
- the instrument panel's side cover.

- Remove:
- the lower cover mounting bolts (3),
- the lower cover mounting clip (or bolt) (5).
- Unclip lower cover (4).
- Disconnect the various connectors (depending on equipment level).
- Remove the lower cover.
- Remove the mounting bolts of the half shells (see Steering column switch assembly: Removal - Refitting).
Note: Do not remove the steering wheel switch assembly.
- Unclip the two half shells.
- Remove the lower half shell.
II - OPERATION FOR REMOVAL OF PART CONCERNED
VEHICLE WITH KEY

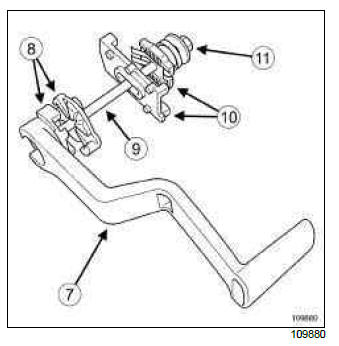
- Remove:
- the nut (6) on the adjustment handle shaft,
- the locking mechanism,
- the adjustment handle.
VEHICLE WITH CARD
- Remove:
- the nut (12) on the adjustment handle shaft using an 18 mm spanner,
- the washer,
- the adjustment handle,
- the locking mechanism.
Note: the connecting shaft is trapped on the steering column.
REFITTING
I - REFITTING PREPARATION OPERATION
VEHICLE WITH KEY
- Handle
- Indexed adjustment plates
- Connection shaft
- Locking mechanism
- Adjustment handle shaft nut
Note: When the handle is refitted, ensure the two indexed adjustment plates and retaining spring are correctly positioned.
VEHICLE WITH CARD
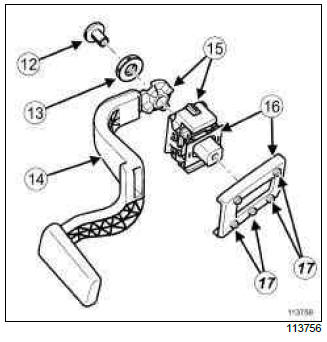
- Adjustment handle shaft nut
- Washer
- Handle
- Indexed adjustment plates
- Locking mechanism
Note: When refitting the handle, make sure that the studs (17) of the indexed adjustment plates are correctly positioned and that the direction of the locking mechanism is correct.
II - OPERATION FOR REFITTING PART CONCERNED
VEHICLE WITH KEY
- Refit:
- the adjustment handle.
- the locking mechanism,
- the adjustment handle mounting nut.
Note: The amount of effort required to operate the handle is determined by how much it is tightened.
Test to determine the correct tightening.
VEHICLE WITH CARD
- Refit:
- the locking mechanism,
- the adjustment handle,
- the washer,
- the nut on the adjustment handle shaft.
Note: The amount of effort required to operate the handle is determined by how much it is tightened.
Test to determine the correct tightening.
III - FINAL OPERATION
- Reattach the two half shells.
- Refit the mounting bolts of the half shells.
- Refit the lower cover.
- Connect the various connectors (depending on equipment level).
- Engage the lower cover clips.
- Refit:
- the lower cover mounting clip (or bolt),
- the lower cover mounting bolts,
- the instrument panel's side cover,
- the bolt-cover protective strip,
- the lower trim of the driver's side dashboard,
- the mounting clips on the lower trim of the driver's side dashboard.
- Connect the battery (see Battery: Removal - Refitting).
READ NEXT:
 Steering wheel: Removal - Refitting
IMPORTANT
Consult the safety and cleanliness advice and operation
recommendations before carrying out any repair (see Steering: Precautions for
the repair).
REMOVAL
I - REMOVAL PREPARATION OPERATIO
Power Assisted Steering
Power-assisted steering: Function
Assistance varies according to vehicle speed.
IMPORTANT
Do not remove any steering column component.
Note:
During fault finding, the Service warning light
flashes at
SEE MORE:
Rear Seat Frames And Mechanisms
Single unit rear bench seatback: Removal - Refitting
REMOVAL
I - REMOVAL PREPARATION OPERATION
Remove the single unit rear bench seat base (see
76A, Rear seat frames and mechanisms, Single
unit rear bench seat base: Removal - Refitting, 76A-6).
II - OPERATION FOR REMOVAL OF PART
CONCERNED
R
Airbags and pretensioners: Recycling - Destruction
IMPORTANT
To avoid all risk of damage to the systems, apply
the safety and cleanliness instructions and operation
recommendations before carrying out any
repair (see 88C, Air bag and Pretensioners, Airbag
and pretensioners: Precautions for the
repair, 88C-6).
IMPORTANT
To eliminate the risk of any
