Renault Clio: Wiping - Washing
Wiping and washing: List and location of components
- Passenger compartment fuse and relay box
- Protection and Switching Unit
- Power supply fuse board
- UCH
- Rain sensor
- Wiper switch
- Windscreen wiper motor
- Rear screen wiper motor
- Washer pump
- Headlight washer pump
I - PASSENGER COMPARTMENT FUSE AND RELAY BOX

II - PROTECTION AND SWITCHING UNIT

III - POWER SUPPLY FUSE BOARD
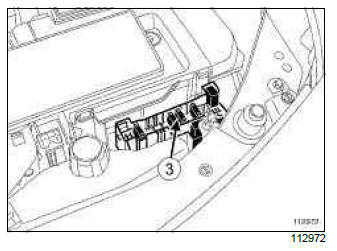
IV - UCH

V - RAIN AND LIGHT SENSOR
VI - WIPER SWITCH

VII - WINDSCREEN WIPER MOTOR

VIII - REAR SCREEN WIPER MOTOR

IX - WASHER PUMP
X - HEADLIGHT WASHER PUMP

Wiping and washing: Function
I - AUTOMATIC OPERATION
vehicles may be fitted with a wiper stalk with a sensitivity adjustment ring for the rain sensor.
In this instance the vehicles have:
- a sensor sensitivity ring on the wipers stalk,
- rain and light sensors.
To operate the system, move the wiper stalk to the " intermittent " position.
If switching the ignition off, reposition the stalk at " stop " then " intermittent ".
Note: Vehicles not fitted with a rain sensor have an intermittent automatic system with a timing modification ring.
II - OPERATING NOTES
If there is too much stress on the wiper arms (e.g.: at high speed), the Protection and Switching unit automatically commands wiping at a lower speed.
If the wiper mechanism is jammed (e.g.: icy windscreen), the protection and switching unit automatically cuts the supply to the motor.
If the windscreen wipers have been requested (by the stalk or by the rain sensor), changing to reverse gear will activate the rear wiper.
Any movement of the wiper stalk overrides and cancels any UCH commands from the Protection and Switching Unit.
The intermittent rear wiper system is governed by the vehicle speed.
If the UCH does not detect any signal from the steering column control, the wiper speed selected before the fault is maintained.
The UCH has configurations which are specific to the washing - wiping function (see Fault finding - Configurations and programming) (MR 394, 87B, Connection unit).
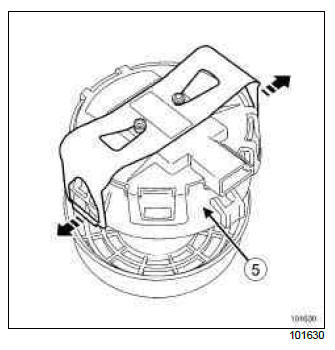
Rain and light sensor: Removal - Refitting
LIGHTS + AUTOMATIC WINDSCREEN WIPER
REMOVAL
I - REMOVAL PREPARATION OPERATION

- Unclip the upper casing using a flat-blade screwdriver (1).

- Remove the lower cover (2).
II - OPERATION FOR REMOVAL OF PART CONCERNED

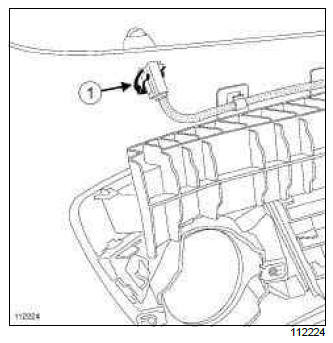
- Disconnect the connector.
- Unclip the two side clips (3) from the detector using a small screwdriver.
REFITTING
I - REFITTING PREPARATION OPERATION
- Clean the windscreen using a wooden spatula (so as not to scratch the surface).
WARNING
Refit the rain sensor in perfectly clean conditions: any dust or fibres could cause a fault.
Do not touch the electronic part of the sensor. Fit the sensor to the vehicle immediately after removing it from its packaging.

Note: When replacing the windscreen (and keeping the rain and light sensor), it is essential to replace the sensor's adhesive base (4).
The adhesive base is available separately from the Parts Department.
II - REFITTING OPERATION FOR PART CONCERNED
- Position the sensor on the support.
- Clip the sensor on the support.
- Connect the connector.
III - FINAL OPERATION.
- Clip in place the interior rear-view mirror casings.
- Carry out an operating test:
- select automatic wiping,
- spray water droplets onto the windscreen within the sensor's detection area,
- check that the automatic wiping function is operating correctly.
Windscreen wiper blade: Removal - Refitting
REMOVAL
OPERATION FOR REMOVAL OF PART CONCERNED

- Squeeze the clips (1) and move downwards simultaneously (2).
- Remove the blade (3).
REFITTING
REFITTING OPERATION FOR PART CONCERNED
- Clip the blade onto the wiper arm.
Windscreen wiper arm: Removal - Refitting

REMOVAL
I - REMOVAL PREPARATION OPERATION
- Operate the wiper switch to set the wiper motor in
the park position.
- move the switch from 0 to 1.
- move the switch from 1 to 0.
- Open the cover.
- Mark the position of the wiper arms.
II - OPERATION FOR REMOVAL OF PART CONCERNED

- Remove:
- the nut covers (1),
- the wiper arm nuts (1),
- the wiper arms using the (Ele. 1294-01)
REFITTING
I - REFITTING OPERATION FOR PART CONCERNED
- Refit:
- the wiper arms in the position marked before removal,
- the wiper arm nuts.
- Torque tighten the wiper arm nuts (21 Nm).
II - FINAL OPERATION.
- Refit the nut covers.
- Test that the wipers operate correctly.
- Close the bonnet.
Wiping arm: Removal - Refitting

REMOVAL

- Move the wiper switch to set the wiper motor in the
park position.
- move the switch from status 0 to 1.
- move the switch from 1 to 0.
- Lift the bonnet.
- Note the position of the wiper arms.
- Remove:
- the covers (1),
- the wiper arm mounting nuts (1),
- the wiper arms using the (Ele. 1294-01).
REFITTING
- Refit the wiper arms in the position marked before removal.
- Torque tighten the wiper arm mounting nuts (21 N.m) (2).
- Refit the covers (2).
- Test that the wipers operate correctly.
Windscreen wiper mechanism: Removal - Refitting

REMOVAL
I - REMOVAL PREPARATION OPERATION
- Remove the wiper arms (see 85A, Wiping - Washing, Windscreen wiper arm: Removal - Refitting, 85A-8).
- Disconnect the battery (see 80A, Battery, Battery: Removal - Refitting, 80A-1).
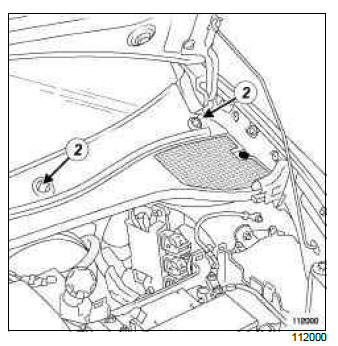
- Remove the scuttle panel grille (see Scuttle panel grille: Removal - Refitting) (MR 393, 56A, Exterior equipment).
II - OPERATION FOR REMOVAL OF PART CONCERNED
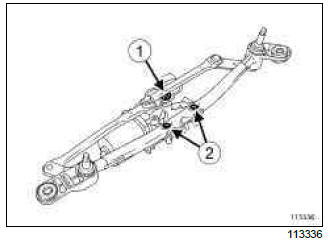
LEFT-HAND DRIVE

- Unclip the trim (1) under the scuttle panel grille.

- Note the position of the motor shaft linkage (2) in relation to the mechanism.
- Remove the wiper mechanism bolts (3).
- Partially remove the mechanism and disconnect the connector.
- Remove the mechanism.
RIGHT-HAND DRIVE

- Unclip the trim (4) under the scuttle panel grille.

- Note the position of the motor shaft linkage (5) in relation to the mechanism.
- Remove:
- the motor shaft linkage nut (7),
- the mechanism bolts (6).
- Partially remove the mechanism and disconnect the connector.
- Remove the mechanism.

- Remove the offset mechanism bolts (8) and (9).
- Remove the linkage.
REFITTING
REFITTING OPERATION FOR PART CONCERNED
LEFT-HAND DRIVE
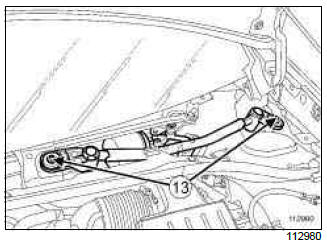
- Check that the motor shaft linkage (10) is correctly positioned.
- Connect the connector.
- Refit the mechanism.
- Torque tighten the mechanism bolts (8 Nm).
- Refit the trim.
RIGHT-HAND DRIVE

- Refit the offset mechanism.
- Torque tighten the offset mechanism bolts (8 Nm) (11) and (12).
- Connect the connector.
- Refit the mechanism.
- Torque tighten the mechanism bolts (8 Nm) (13).

- Refit the motor shaft linkage (14) in the position noted before removal.
- Torque tighten the motor shaft linkage nut (18 Nm).
- Refit the trim under the scuttle panel grille.
FINAL OPERATION.
- Refit the scuttle panel grille (see Scuttle panel grille: Removal - Refitting) (MR 393, 56A, Exterior equipment).
- Connect the battery (see 80A, Battery, Battery: Removal - Refitting, 80A-1).
- Operate the wiper switch to set the wiper motor in
the park position.
- move the switch from status 0 to 1.
- move the switch from 1 to 0.
- Refit the wiper arm (see 85A, Wiping - Washing, Windscreen wiper arm: Removal - Refitting, 85A-8).
Windscreen wiper motor: Removal - Refitting

I - REMOVAL PREPARATION OPERATION
- Remove the windscreen wiper mechanism (see 85A, Wiping - Washing, Windscreen wiper mechanism: Removal - Refitting, 85A-10).
II - OPERATION FOR REMOVAL OF PART CONCERNED
LEFT-HAND DRIVE
Note: Mark the position of the motor shaft linkage in relation to the mechanism before removing it.
- Remove:
- the motor bolts (1) and (2) on the mechanism,
- the motor.
RIGHT-HAND DRIVE

- Remove:
- the motor bolts (3) on the mechanism,
- the motor.
REFITTING
REFITTING OPERATION FOR PART CONCERNED
LEFT-HAND DRIVE

- refit:
- the motor.
- the bolts (4).
- Torque tighten the motor bolts (9 N.m) (4).

- Position the motor shaft linkage (5) as shown in the illustration above.
- Torque tighten the motor shaft linkage nut (18 Nm).
RIGHT-HAND DRIVE

- Refit:
- the motor.
- the motor bolts (6) on the mechanism.
- Torque tighten the motor bolts (9 N.m) (6).
- Align the motor shaft linkage as shown in the illustration above.
- Torque tighten the motor shaft linkage nut (18 Nm).
FINAL OPERATION.
Note: Check that the motor is correctly positioned in the park position after tightening the nut.
- Refit the windscreen wiper mechanism (see 85A, Wiping - Washing, Windscreen wiper mechanism: Removal - Refitting, 85A-10).
Rear screen wiper motor: Removal - Refitting
REMOVAL
I - REMOVAL PREPARATION OPERATION
- Remove:
- the tailgate trim (see Tailgate trim: Removal - Refitting) (MR 393, 73A, Non-side opening elements trim),
- the rear screen wiper arm (see 85A, Wiping - Washing, Rear screen wiper arm: Removal - Refitting, 85A-20).
II - OPERATION FOR REMOVAL OF PART CONCERNED

- Disconnect the connector (1).
Note: Be careful not to damage the outer skin and the tailgate box when removing the rivets. Recover the rivet bodies from the tailgate box section.
- Drill out the rivets (see MR 400, 40A, General information).
- Remove the motor.
REFITTING
I - REFITTING OPERATION FOR PART CONCERNED

- Replace the seal (2) if necessary.

- Position the motor.
- Rivet the engine (see MR 400, 40A, General information) (Rivets Part no. 77 03 072 362).
- Connect the motor connector.
II - FINAL OPERATION.
- Refit:
- the tailgate trim (see Tailgate trim: Removal - Refitting) (MR 393, 73A, Non-side opening elements trim),
- the rear screen wiper arm (see 85A, Wiping - Washing, Rear screen wiper arm: Removal - Refitting, 85A-20).
Screen washer pump: Removal - Refitting
REMOVAL
I - REMOVAL PREPARATION OPERATION
- Remove the front bumper (see Front bumper: Removal - Refitting) (MR 393, 55A, Exterior protection).
II - REMOVAL OPERATION FOR PART CONCERNED

Note: Mark the routing of the supply pipes and wiring.
- Unclip the supply pipes.
- Disconnect the connector.
- Unclip the windscreen washer pump.
REFITTING
I - REFITTING OPERATION FOR PART CONCERNED
- Fit the windscreen washer pump.
- Connect the connector.
- Clip on the supply pipes.
II - FINAL OPERATION.
- Refit the front bumper (see Front bumper: Removal - Refitting) (MR 393, 55A, Exterior protection).
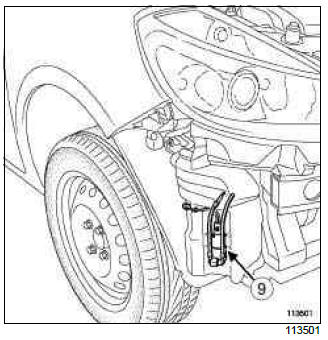
Headlight washer pump: Removal - Refitting
HEADLIGHT WASHERS WITH BLADE
REMOVAL
I - REMOVAL PREPARATION OPERATION
- Remove the front wheel arch liner (see Front wheel arch liner: Removal - Refitting) (MR 393, 55A, Exterior protection).
II - REMOVAL OPERATION FOR PART CONCERNED
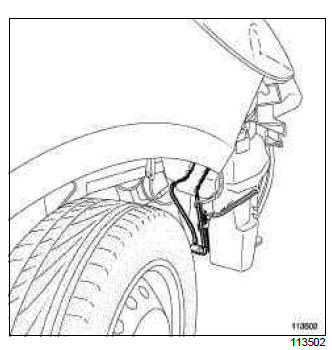
- Unclip the supply pipes.
- Disconnect the connector.
- Unclip the headlight washer pump.
Note: Mark the routing of the supply pipes and wiring.
REFITTING
I - REFITTING OPERATION FOR PART CONCERNED
- Clip on the headlight washer pump.
- Connect the connector.
- Clip on the supply pipes.
II - FINAL OPERATION.
- Refit the front wheel arch liner (see Front wheel arch liner: Removal - Refitting) (MR 393, 55A, Exterior protection).
Headlight washer jet: Removal - Refitting
HEADLIGHT WASHERS WITH BLADE
REMOVAL
I - REMOVAL PREPARATION OPERATION
- Remove the front bumper (see Front bumper: Removal - Refitting) (MR 393, 55A, Exterior protection).
II - OPERATION FOR REMOVAL OF PART CONCERNED
- Remove clip (1).
- Disconnect the supply pipe.
- Remove the jet.
REFITTING
I - REFITTING OPERATION FOR PART CONCERNED
- Refit the jet.
- Connect the supply pipe.
- Refit the clip.
II - FINAL OPERATION.
- Refit the front bumper (see Front bumper: Removal - Refitting) (MR 393, 55A, Exterior protection).
Rear screen wiper arm: Removal - Refitting

REMOVAL
OPERATION FOR REMOVAL OF PART CONCERNED

- Unclip the blanking cover by applying slight pressure (1) on the clip (2).
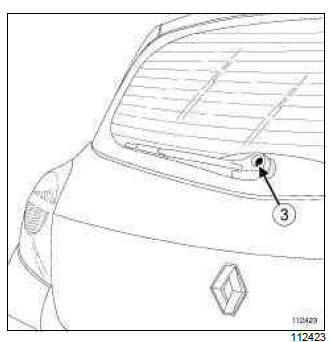
- Mark the position of the rear screen wiper arm before removing it.
- Remove:
- the wiper arm nut (3),
- the wiper arm using the (Ele. 1781).
REFITTING
REFITTING OPERATION FOR PART CONCERNED
Note: It is essential to initialise the rear screen wiper motor in the park position.
- Operate the wiper switch to set the wiper motor in
the park position.
- move the switch from 0 to 1.
- move the switch from 1 to 0.
- Check that the wiper switch remains at position 0.
- Clean the motor shaft splines.

- Refit the wiper arm in the rest position.
- Torque tighten the wiper arm nut (12 N.m).
- Refit the blanking cover.
Windscreen washer reservoir: Removal - Refitting
REMOVAL
I - REMOVAL PREPARATION OPERATION
- Remove:
- the front bumper (see Front bumper: Removal - Refitting) (MR 393, 55A, Exterior protection),
- the headlight (see 80B, Headlights, Headlight: Removal - Refitting, 80B-7).
II - REMOVAL OPERATION FOR PART CONCERNED

- Unclip:
- the filler neck,
- the supply pipes,
- the connector,
- Remove:
- the bolt (1),
- the bottle.
Note: Mark the routing of the supply pipes and wiring.
REFITTING
I - REFITTING OPERATION FOR PART CONCERNED
- Refit:
- the bottle,
- bolt (1).
- Clip:
- the filler neck,
- the connector,
- the supply pipes.
II - FINAL OPERATION.
- Refit:
- the headlight (see 80B, Headlights, Headlight: Removal - Refitting, 80B-7),
- the front bumper (see Front bumper: Removal - Refitting) (MR 393, 55A, Exterior protection).
READ NEXT:
 Radio
Radio
Radio: List and location of components
I - LIST OF COMPONENTS
The radio system comprises:
a radio control satellite (see 86A, Radio, Radio control
satellite: Removal - Refitting, 86A-19)
a radio a
Car Phone
Car phone: List and location of components
CAR PHONE PRE-EQUIPMENT or HANDS-FREE TELEPHONE KIT
I - LIST OF COMPONENTS
The " car phone " consists of:
a telephone aerial
a computer
a "hands-free" mi
Passenger Compartment Connection Unit
UCH: Removal - Refitting
RIGHT-HAND DRIVE
REMOVAL
I - REMOVAL PREPARATION OPERATION
If replacing the UCH, carry out the necessary programming
using the Diagnostic tool. (see Fault
finding - Repla
SEE MORE:
Parking Distance Control
Parking distance control: List and location of
components
REAR PROXIMITY RADAR
I - LIST OF COMPONENTS
The parking distance control function consists of:
rear proximity sensors,
a parking distance control buzzer,
a parking distance control computer,
a parking distance control switch.
II - LOCA
Rear axle system: Tightening torque
Rear axle assembly: Adjustment values
EQUIPMENT LEVEL E3 LEISURE or EQUIPMENT LEVEL EA1 or EQUIPMENT LEVEL EA2
or EQUIPMENT
LEVEL EA3 or EQUIPMENT LEVEL EA4 or EQUIPMENT LEVEL EA5 or EQUIPMENT LEVEL EAG
I - PRELIMINARY OPERATIONS
Before checking the axles on the test bench, check the
tyre press
