Renault Clio: Hydraulic unit without ESP: Removal - Refitting
LEFT-HAND DRIVE

WARNING
Prepare for the flow of fluid, and protect the surrounding components.
REMOVAL
I - REMOVAL PREPARATION OPERATION
- Position the vehicle on a two-post lift (see Vehicle: Towing and lifting) (MR 392, 02A, Lifting equipment).
- Disconnect the battery (see Battery: Removal - Refitting) (MR 392, 80A, Battery).
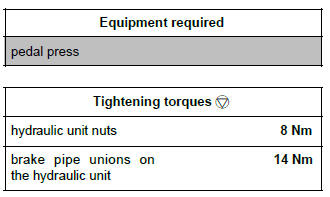
- Position a pedal press on the brake pedal to limit the outflow of brake fluid.
K9K
- Remove:
- the wiper arms (see Wiping arm: Removal - Refitting) (MR 392, 85A, Wiping - Washing),
- the scuttle panel grille (see Scuttle panel grille: Removal - Refitting) (MR 392, 56A, Exterior equipment),
- the scoop under the scuttle panel grille (see Scoop under the scuttle panel grille: Removal - Refitting) (MR 392, 56A, Exterior equipment).
M4R
- Remove the intake distributor (see Inlet distributor: Removal - Refitting) (MR 392, 12A, Fuel mixture).

- Remove the two soundproofing clips (1).
- Remove the soundproofing to access the hydraulic unit.
K4J or K4M

- Remove the lifting eye (2).
II - OPERATION FOR REMOVAL OF PART CONCERNED
D4F or K4J or K4M or M4R

- Disconnect the connector (3) from the hydraulic unit computer by lifting the lock on the connector (4).
- Remove the brake pipe unions from the hydraulic unit.
- Undo the hydraulic unit nuts (5) on its support.
K9K

- Disconnect the computer connector from the hydraulic unit.
- Remove the brake pipe unions on the hydraulic unit.
- Undo the hydraulic unit nuts (5) on its mounting.
- Remove the hydraulic unit.
REFITTING
I - REFITTING OPERATION FOR PART CONCERNED
- Refit the hydraulic unit.
- Torque tighten the hydraulic unit nuts on its mounting (8 Nm).
- Refit the brake pipe unions to the hydraulic unit.
- Torque tighten the brake pipe unions on the hydraulic assembly (14 Nm).
- Connect the computer connector on the hydraulic unit.
II - FINAL OPERATION.
K4J or K4M
- Refit the lifting eye.
M4R
- Refit the intake distributor (see Inlet distributor: Removal - Refitting) (MR 392, 12A, Fuel mixture).
K9K
- Refit:
- the scoop under the scuttle panel grille (see Scoop under the scuttle panel grille: Removal - Refitting) (MR 392, 56A, Exterior equipment),
- the scuttle panel grille (see Scuttle panel grille: Removal - Refitting) (MR 392, 56A, Exterior equipment),
- the wiper arms (see Wiping arm: Removal - Refitting) (MR 392, 85A, Wiping - Washing).
- Remove the pedal press from the brake pedal.
- Connect the battery (see Battery: Removal - Refitting) (MR 392, 80A, Battery).
- Bleed the brake circuit (see 30A, General information, Braking circuit: Bleed, 30A-4).
RIGHT-HAND DRIVE

WARNING
Prepare for brake fluid outflow, to prevent damage to the mechanical parts and bodywork around the braking system.
REMOVAL
I - REMOVAL PREPARATION OPERATION
- Position the vehicle on a two-post lift (see Vehicle: Towing and lifting) (MR 392, 02A, Lifting equipment).
- Disconnect the battery (see Battery: Removal - Refitting) (MR 392, 80A, Battery).
- Fit the pedal press to the brake pedal to limit the outflow of brake fluid.
- Remove:
- the battery (see Battery: Removal - Refitting) (MR 392, 80A, Battery),
- the battery tray (see Battery: Removal - Refitting) (MR 392, 80A, Battery),
- the air filter unit (see Air filter unit: Removal - Refitting) (MR 392, 12A, Fuel mixture).
II - OPERATION FOR REMOVAL OF PART CONCERNED

- Lift the bracket at the bottom of the computer connector (1) on the hydraulic unit.
- Disconnect the computer connector from the hydraulic unit.
- Remove:
- the brake pipe unions (2) on the hydraulic unit,
- the nuts (3) on the hydraulic unit support,
- the hydraulic unit.
REFITTING
I - REFITTING OPERATION FOR PART CONCERNED
- Refit:
- the hydraulic unit,
- the nuts on the hydraulic unit support.
- Torque tighten the nuts on the hydraulic unit support (8 Nm).
- Finger tighten the brake pipe unions on the hydraulic unit.
- Torque tighten the brake pipe unions on the hydraulic assembly (14 Nm).
- Connect the computer connector on the hydraulic unit.
- Lower the computer connector bracket on the hydraulic unit.
II - FINAL OPERATION.
- Refit:
- the air filter unit (see Air filter unit: Removal - Refitting) (MR 392, 12A, Fuel mixture),
- the battery tray (see Battery: Removal - Refitting) (MR 392, 80A, Battery),
- the battery (see Battery: Removal - Refitting) (MR 392, 80A, Battery).
- Remove the pedal press tool on the brake pedal.
- Bleed the braking circuit using the brake circuit bleeding device (see 30A, General information, Braking circuit: Bleed, 30A-4).
- Connect the battery (see Battery: Removal - Refitting) (MR 392, 80A, Battery).
D4F, and 784, and LEFT-HAND DRIVE
WARNING
Prepare for the flow of fluid, and protect the surrounding components.
REMOVAL
I - REMOVAL PREPARATION OPERATION
- Position the vehicle on a two-post lift (see Vehicle: Towing and lifting) (MR 392, 02A, Lifting equipment).
- Disconnect the battery (see Battery: Removal - Refitting) (MR 392, 80A, Battery).
- Position the pedal press on the brake pedal to limit the outflow of brake fluid.
- Remove the front engine cover.

- Remove:
- the bolts (1) from the turbocharger heat shield,
- the turbocharger heat shield (2),
- the oxygen sensor (3) (see Oxygen sensors: Removal - Refitting) (MR 392, 17B, Petrol injection).

- Remove:
- the bulkhead heat shield clips (4),
- the bulkhead heat shield (5).
II - OPERATION FOR REMOVAL OF PART CONCERNED

- Lift the lock (6) at the bottom of the hydraulic unit computer connector.
- Disconnect the hydraulic unit computer connector (7).
- Remove:
- the hydraulic unit brake pipe unions (8),
- the hydraulic unit nuts (9),
- the hydraulic unit.
REFITTING
I - REFITTING OPERATION FOR PART CONCERNED
- Refit:
- the hydraulic unit,
- the hydraulic unit nuts,
- the hydraulic unit brake pipe unions.
- Torque tighten:
- the hydraulic unit nuts (8 Nm),
- the brake pipe unions on the hydraulic unit (14 Nm).
- Connect the hydraulic unit computer connector.
- Lower the hydraulic unit computer connector lock.
II - FINAL OPERATION.
- Refit:
- the bulkhead heat shield,
- the bulkhead heat shield clips,
- the oxygen sensor (see Oxygen sensors: Removal - Refitting) (MR 392, 17B, Petrol injection).
- Refit:
- the turbocharger heat shield,
- the heat shield bolts,
- the engine cover.
- Remove the pedal press from the brake pedal.
- Connect the battery (see Battery: Removal - Refitting) (MR 392, 80A, Battery).
- Bleed the brake circuit (see 30A, General information, Braking circuit: Bleed, 30A-4).
READ NEXT:
 Hydraulic unit with ESP: Removal - Refitting
LEFT-HAND DRIVE
WARNING
Prepare for brake fluid outflow, to prevent damage
to the mechanical parts and bodywork around the
braking system.
REMOVAL
I - REMOVAL PREPARATION OPERATION
Position the veh
Wheel speed sensor: Removal - Refitting
EQUIPMENT LEVEL EAC or EQUIPMENT LEVEL SPORT
REMOVAL
I - REMOVAL PREPARATION OPERATION
Position the vehicle on a two-post lift (see 02A, Lifting
Equipment, Vehicle: Towing and lifting).
Disconnec
Lateral acceleration and yaw sensor: Removal - Refitting
REMOVAL
I - REMOVAL PREPARATION OPERATION
Disconnect the battery (see Battery: Removal - Refitting)
(MR 392, 80A, Battery).
Remove the centre console (see Centre console:
Removal - Refitting) (M
SEE MORE:
Side Opening Elements
Front side door: Removal - Refitting
I - REMOVAL WITHOUT HINGES
1 - REMOVAL PREPARATION OPERATION
Disconnect the door wiring harness supply connector.
2 - OPERATION FOR REMOVAL OF PART
CONCERNED
Remove:
the door mounting nuts (1),
the door.
II - REFITTING WITHOUT HINGES
1 - OPERATION
RENAULT card: battery
Replacing the battery
When the message “KEYCARD
BATTERY LOW” appears on the instrument
panel, replace the RENAULT card
battery, press button 1 pulling on emergency
key 2, then unclip the cover 3
using tab 4.
Remove the battery by pressing on one
side (movement A) and by lifting the
