Renault Clio: Side Opening Elements
Front side door: Removal - Refitting

I - REMOVAL WITHOUT HINGES
1 - REMOVAL PREPARATION OPERATION
- Disconnect the door wiring harness supply connector.
2 - OPERATION FOR REMOVAL OF PART CONCERNED

- Remove:
- the door mounting nuts (1),
- the door.
II - REFITTING WITHOUT HINGES
1 - OPERATION FOR REFITTING PART CONCERNED
- Refit:
- the door,
- the door mounting nuts (1).
- Adjust the door clearances and shut lines (see 47A, Side opening elements, Front side door: Adjustment, 47A-3).
- Torque tighten the door mounting nuts (21 Nm).
2 - FINAL OPERATION
- Connect the wiring harness supply connector.
III - REMOVAL WITH HINGES
1 - REMOVAL PREPARATION OPERATION
- Remove the front wing (see 42A, Front upper structure, Front wing: Removal - Refitting, 42A-3).
- Disconnect the door wiring harness supply connector.
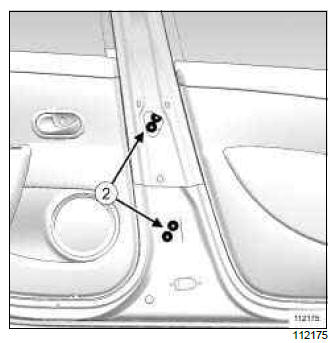
2 - OPERATION FOR REMOVAL OF PART CONCERNED

- Remove:
- the hinge mounting bolts (2),
- the door.
IV - REFITTING WITH HINGES
1 - OPERATION FOR REFITTING PART CONCERNED
- Refit:
- the door,
- the hinge mounting bolts (2).
- Adjust the door clearances and shut lines (see 47A, Side opening elements, Front side door: Adjustment, 47A-3).
- Torque tighten the hinge mounting bolts (21 Nm).
2 - FINAL OPERATION
- Connect the wiring harness supply connector.
- Refit the front wing (see 42A, Front upper structure, Front wing: Removal - Refitting, 42A- 3).
Front side door: Adjustment

ADJUSTMENT VALUES
- For information on the front side door adjustment values (see Vehicle panel gaps: Adjustment value) (01C, Vehicle bodywork specifications).
ADJUSTMENT
- There are two options for adjusting the door:
- by means of the mountings on the door box section (opening clearance adjustment),
- by means of the mountings on the A-pillar (shut line adjustment): the front wing needs to be removed for this operation.
B85 or K85
5-door version

- Observe the adjustment sequence.
C85 or S85
3-door version

- Observe the adjustment sequence.

- Symbols A, B, C and D show the adjustment
options.
The black dot in the centre represents the body of the bolt.
The grey section represents the component to be adjusted.
The white section represents the adjustment area.
I - ADJUSTMENT OF OPENING CLEARANCES WITH THE FRONT WING AND THE REAR DOOR

- Remove the door box section nuts (6).
- Undo the guide pins and the indexing bolt (7).

- Adjust the opening clearance with the front wing and the rear door.
- Tighten to torque:
- the guide pins on the door box section (13 Nm),
- the indexing bolt on the door box section (13 Nm).
- Refit the door box section nuts (6).
- Torque tighten the door box section nuts (21 Nm).
II - REAR DOOR SHUT LINE ADJUSTMENT

- Remove the front wing (see 42A, Front upper structure, Front wing: Removal - Refitting, 42A-3).
- Undo the door hinge bolts (8) on the A-pillar.

- Adjust the panel gaps with the rear door.
- Torque tighten the hinge bolts on the A-pillar (21 Nm).
- Refit the front wing (see 42A, Front upper structure, Front wing: Removal - Refitting, 42A- 3).
Front side door: Stripping - rebuilding
The order of the operations described below applies specifically to replacing the door.
Note: It is possible to carry out the stripping operations on the vehicle before removing the door.
STRIPPING
- Remove:
- the door trim (see Front side door trim: Removal - Refitting),
- (see Door sealing film: Removal - Refitting),
- the door mirror (see Door mirror: Removal - Refitting),
- the glass run channel (see Front side door window run channel: Removal - Refitting),
- the sliding window (see Front side door sliding window: Removal - Refitting),
- the window lift mechanism (see Front side door electric window mechanism: Removal - Refitting) or (see Rear side door manual window winder mechanism: Removal - Refitting),
- the exterior handle (see Exterior door handle: Removal - Refitting),
- the door lock (see Front side door lock: Removal - Refitting).
- the wiring harness,
- the door exterior protection strip (see Front side door protective strip: Removal - Refitting),
- the front door impact padding.
REBUILDING
- Fit the decorative side strip (see Side decorative strips: Removal - Refitting).
- Refit:
- the front door impact padding,
- the wiring harness,
- the door lock (see Front side door lock: Removal - Refitting).
- the exterior handle (see Exterior door handle: Removal - Refitting),
- the window lift mechanism (see Front side door electric window mechanism: Removal - Refitting) or (see Rear side door manual window winder mechanism: Removal - Refitting),
- the sliding window (see Front side door sliding window: Removal - Refitting),
- the glass run channel (see Front side door window run channel: Removal - Refitting),
- the door mirror (see Door mirror: Removal - Refitting),
- the sealing film (see Door sealing film: Removal - Refitting),
- the door trim (see Front side door trim: Removal - Refitting),
- the door exterior protection strip (see Front side door protective strip: Removal - Refitting).
Rear side door: Removal - Refitting
B85 or K85

I - REMOVAL WITHOUT HINGES
1 - REMOVAL PREPARATION OPERATION
- Disconnect the front side door connector.
2 - OPERATION FOR REMOVAL OF PART CONCERNED

- Remove:
- the door nuts (1),
- the door.
II - REFITTING WITHOUT HINGES
1 - OPERATION FOR REFITTING PART CONCERNED
- Refit:
- the door,
- the door nuts (1).
- Adjust the door clearances and flush fittings (see Vehicle panel gaps: Adjustment value) (01C, Vehicle bodywork specifications).
- Torque tighten the door nuts (21 Nm).
2 - FINAL OPERATION
- Connect the front side door connector.
III - REMOVAL WITH HINGES
1 - REMOVAL PREPARATION OPERATION
- Remove the B-pillar lower trim (see B-pillar trim: Removal - Refitting) (71A, Body internal trim).
- Disconnect the front side door connector.
2 - OPERATION FOR REMOVAL OF PART CONCERNED
- Remove:
- the hinge nuts (2),
- the door.
IV - REFITTING WITH HINGES
1 - OPERATION FOR REFITTING PART CONCERNED
- Refit:
- the door,
- the hinge nuts (2).
- Adjust the door clearances and flush fittings (see Vehicle panel gaps: Adjustment value) (01C, Vehicle bodywork specifications).
- Torque tighten the hinge nuts (21 Nm).
2 - FINAL OPERATION
- Connect the front side door connector.
- Refit the B-pillar lower trim (see B-pillar trim: Removal - Refitting) (71A, Body internal trim).
Rear side door: Adjustment
B85 or K85

ADJUSTMENT VALUES
- For information on the rear side door adjustment values (see Vehicle panel gaps: Adjustment value) (01C, Vehicle bodywork specifications).
ADJUSTMENT
- There are two options for adjusting the door:
- by means of the mountings on the door box section (opening clearance adjustment),
- by means of the mountings on the B-pillar (shut line adjustment): this operation requires the removal of the B-pillar interior trim.

- Observe the adjustment sequence.

- Symbols A, B, C and D show the adjustment
options.
The black dot in the centre represents the body of the bolt.
The grey section represents the component to be adjusted.
The white section represents the adjustment area.
I - ADJUSTMENT OF OPENING CLEARANCE WITH THE FRONT DOOR AND THE REAR WING

- Remove the door box section nuts (3).
- Undo the guide pins and the indexing bolt (4).

- Adjust the door shut lines.
- Tighten to torque:
- the guide pins on the door box section (13 Nm),
- the indexing bolt on the door box section (13 Nm).
- Refit the door box section nuts (3).
- Torque tighten the hinge nuts on the door box section (21 N.m).
II - ADJUSTMENT OF SHUT LINES WITH THE FRONT DOOR AND THE REAR WING

- Remove the B-pillar lower trim (see B-pillar trim: Removal - Refitting) (71A, Body internal trim).
- Undo the hinge nuts (5) on the B-pillar.

- Adjust the door shut lines.
- Torque tighten the hinge nuts on the B-pillar (21 Nm).
- Refit the B-pillar lower trim (see B-pillar trim: Removal - Refitting) (71A, Body internal trim).
Rear side door: Stripping - rebuilding
B85 or K85
The order of the operations described below applies specifically to replacing the door.
Note: It is possible to carry out the stripping operations on the vehicle before removing the door.
STRIPPING
- Remove:
- the door trim (see Rear side door trim: Removal - Refitting),
- (see Rear speakers: Removal - Refitting),
- the sealing film (see Door sealing film: Removal - Refitting),
- the glass run channel (see Rear side door window run channel: Removal - Refitting),
- the sliding window (see Rear side door sliding window: Removal - Refitting),
- the window lift mechanism (see Rear side door electric window mechanism: Removal - Refitting) or (see Rear side door manual window winder mechanism: Removal - Refitting),
- the rear door fixed window (see Rear side door fixed window: Removal - Refitting),
- the exterior handle (see Exterior door handle: Removal - Refitting),
- the door lock (see Rear side door lock: Removal - Refitting),
- the wiring harness,
- the door strip (see Rear side door protective strip: Removal - Refitting).
REBUILDING
- Fit the decorative side strip (see Side decorative strips: Removal - Refitting).
- Refit:
- the wiring harness,
- the door lock (see Rear side door lock: Removal - Refitting),
- the exterior handle (see Exterior door handle: Removal - Refitting),
- the rear door fixed window (see Rear side door fixed window: Removal - Refitting),
- the window lift mechanism (see Rear side door electric window mechanism: Removal - Refitting) or (see Rear side door manual window winder mechanism: Removal - Refitting),
- the sliding window (see Rear side door sliding window: Removal - Refitting),
- the glass run channel (see Rear side door window run channel: Removal - Refitting),
- the sealing film (see Door sealing film: Removal - Refitting),
- the speaker (see Rear speakers: Removal - Refitting),
- the door trim (see Rear side door trim: Removal - Refitting),
- the door strip (see Rear side door protective strip: Removal - Refitting).
Fuel filler flap cover: Removal - Refitting
REMOVAL
OPERATION FOR REMOVAL OF PART CONCERNED

- Unclip the fuel filler flap from its mounting.
REFITTING
REFITTING OPERATION FOR PART CONCERNED

- Clip the fuel filler flap cover onto its mounting.
READ NEXT:
 Non-side Opening Elements
Bonnet: Removal - Refitting
I - REMOVAL BY MEANS OF THE BONNET BOLTS
1 - REMOVAL PREPARATION OPERATION
Remove the bonnet soundproofing (see Bonnet soundproofing: Removal -
Refitting).
Remove
Mechanisms And Accessories
Clio IV is equipped with a range of mechanisms and accessories that enhance functionality and convenience. These include power steering, which provides easy maneuverability and precise control, making
SEE MORE:
Immobiliser system: List and location of components
I - LIST OF COMPONENTS
II - LOCATION OF COMPONENTS
VEHICLE WITH KEY
1 - Antenna/Transponder ring
2 - Ignition switch
3 - UCH
4 - Key
VEHICLE WITH CARD
5 - Front starting aerial
6 - Central starting aerial
7 - Rear starting aerial
8 - Start button
9 - Card reader
10 - UCH
11 - Electric ste
Coolant temperature sensor: Removal - Refitting
REMOVAL
I - REMOVAL PREPARATION OPERATION
Disconnect the battery (see Battery: Removal - Refitting)
(80A, Battery).
Remove:
the engine cover,
the air intake sleeve.
II - OPERATION FOR REMOVAL OF PART
CONCERNED
Disconnect the coolant temperature sensor connector (1).
Unclip the retai
