Renault Clio: Immobiliser system: List and location of components
I - LIST OF COMPONENTS

II - LOCATION OF COMPONENTS
VEHICLE WITH KEY
1 - Antenna/Transponder ring

2 - Ignition switch

3 - UCH
4 - Key

VEHICLE WITH CARD
5 - Front starting aerial

6 - Central starting aerial

7 - Rear starting aerial

8 - Start button

9 - Card reader

10 - UCH

11 - Electric steering column lock

12 - Card

Starting aerial: Removal - Refitting
VEHICLE WITH CARD

REMOVAL
I - REMOVAL PREPARATION OPERATION
1 - Front starting aerial
- Remove the centre console (see Centre console: Removal - Refitting) (MR 393, 57A, Interior equipment).

- Unclip the trim at (1) and (2).
RADIO NO. 01 or RADIO NO. 02 or RADIO NO.03 or RADIO NO. 04 or RADIO NO. 05 or RADIO NO.06
- Remove the radio (see 86A, Radio, Radio: Removal - Refitting, 86A-8).
NAVIGATION AID 1
- Remove the radio navigation system (see 83C, On-board
telematics system, Radio navigation: Removal - Refitting, 83C-3).
WITHOUT NAVIGATION AID, and VEHICLE WITHOUT RADIO
- Unclip the glovebox using the (Car. 1363).

- Unclip the centre front panel at (3).

- Unclip:
- the centre front panel at (4),
- the connectors.
2 - Central starting aerial
- Remove the centre console (see Centre console: Removal - Refitting) (MR 393, 57A, Interior equipment).
3 - Rear starting aerial
- Remove the luggage compartment carpet.
- Lift up the luggage retainer cross member trim.
II - REMOVAL OPERATION FOR THE PART CONCERNED
1 - Front starting aerial

WARNING
The retaining clips are fragile; handle with care.
- Press the retaining clips at (5).

- Unclip:
- the starting aerial (6),
- the connector.
2 - Central starting aerial

WARNING
The retaining clips are fragile; handle with care.
- Press the retaining clips at (7).

- Unclip:
- the starting aerial (8),
- the connector.
3 - Rear starting aerial

WARNING
The retaining clips are fragile; handle with care.
- Press the retaining clips at (9).

- Unclip:
- the starting aerial (10),
- the connector.
REFITTING
I - REFITTING OPERATION FOR THE PART CONCERNED

- Clip on:
- the aerial connector,
- the aerial onto its mounting.
II - FINAL OPERATION
1 - Front starting aerial
- Connect the centre front panel connectors.
- Clip in the centre front panel beginning with the lower section.
RADIO NO. 01 or RADIO NO. 02 or RADIO NO.03 or RADIO NO. 04 or RADIO NO. 05 or RADIO NO.06
- Refit the radio (see 86A, Radio, Radio: Removal - Refitting, 86A-8).
NAVIGATION AID 1
- Refit the radio navigation system (see 83C, On-board
telematics system, Radio navigation: Removal - Refitting, 83C-3).
WITHOUT NAVIGATION AID, and VEHICLE WITHOUT RADIO
- Clip the glovebox in position.
- Clip the trim under the centre front panel.
- Refit the centre console (see Centre console: Removal - Refitting) (MR 393, 57A, Interior equipment).
2 - Central starting aerial
- Refit the centre console (see Centre console: Removal - Refitting) (MR 393, 57A, Interior equipment).
3 - Rear starting aerial
- Refit the luggage compartment carpet.
READ NEXT:
 Ignition switch: Removal - Refitting
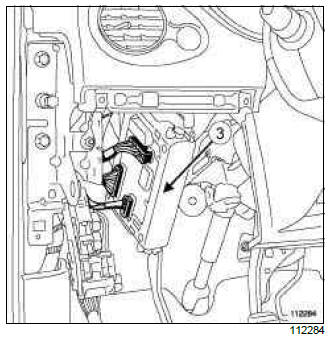
REMOVAL
I - REMOVAL PREPARATION OPERATION
Disconnect the battery (see 80A, Battery, Battery:
Removal - Refitting, 80A-1).
Unclip trim (1).
Remove:
the plastic rivet (2),
bolt (3).
Transponder ring: Removal - Refitting
VEHICLE WITH KEY
REMOVAL
I - REMOVAL PREPARATION OPERATION
Unclip trim (1).
Remove:
the plasti-rivet (2),
the bolt (3).
Remove the door seal.
Unclip the dashboard side face (4).
Start button: Removal - Refitting
VEHICLE WITH CARD
REMOVAL
I - REMOVAL PREPARATION OPERATION
Remove the centre console (see Centre console:
Removal - Refitting) (MR 393, 57A, Interior equipment).
Unclip the trim at (1) and (2
SEE MORE:
Rear stub axle carrier: Removal - Refitting
DISC BRAKE
REMOVAL
I - REMOVAL PREPARATION OPERATION
Position the vehicle on a two-post lift (see Vehicle:
Towing and lifting) (MR 392, 02A, Lifting equipment).
Remove:
the rear wheel in question (see 35A, Wheels and
tyres, Wheel: Removal - Refitting, 35A-1),
the rear brake pads (see 33A,
Crankshaft seal on timing end: Removal - Refitting
K9K
REMOVAL
I - REMOVAL PREPARATION OPERATION
Position the vehicle on a two-post lift (see Vehicle:
Towing and lifting) (MR 392, 02A, Lifting equipment).
Disconnect the battery (see Battery: Removal - Refitting)
(MR 392, 80A, Battery).
Remove the front engine cover.
Remove:
the scuttle
