Renault Clio: Hydraulic distributor: Removal - Refitting
DP0

REMOVAL
I - REMOVAL PREPARATION OPERATION
- Position the vehicle on a two-post lift (see Vehicle: Towing and lifting) (MR 392, 02A, Lifting equipment).
- Shift the selector lever to Neutral.
- Disconnect the battery (see Battery: Removal - Refitting) (MR 392, 80A, Battery).
- Remove:
- the front left-hand wheel (see Wheel: Removal - Refitting) (MR 392, 35A, Wheels and tyres),
- the front left-hand wheel arch liner (see Front wheel arch liner: Removal - Refitting) (MR 393, 55A, Exterior protection),
- the engine undertray.
- Drain the automatic transmission (see 23A, Automatic gearbox, Automatic gearbox oil: Draining - Filling, 23A-2) (MR 392, 23A, Automatic transmission).
- Remove:
- the battery tray (see ) (MR 392, 80A, Battery),
- the air filter unit (see Air filter unit: Removal - Refitting) (MR 392, 12A, Fuel mixture).
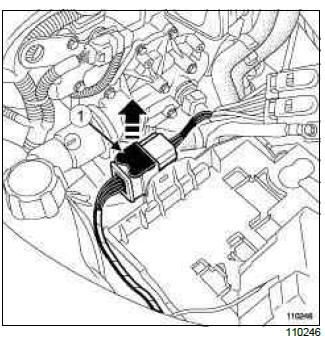
- Disconnect the modular connector by pulling the sliding latch (1).

- Remove:
- the multifunction switch control cable by pressing at (A).
- the control cable sleeve stop from the gearbox support by pulling the catch at (B).
- Drain the cooling system (see Cooling system: Draining - Refilling) (MR 392, 19A, Cooling).
- Remove the expansion bottle hose at the radiator end
- Remove the front bumper (see Front bumper: Removal - Refitting) (MR 393, 55A, Exterior protection)
- Remove the plastic rivet of the expansion bottle.

- Remove:
- the expansion bottle (2) in the direction of the arrow,
- the resonator.
- Remove:
- the cooling hoses at the automatic transmission side,
- the bottom cooling hose, to provide free access to the radiator.
- the fan assembly (see Engine cooling fan assembly: Removal - Refitting) (MR 392, 19A, Cooling).
- Attach the radiator to the upper cross member.

- Remove:
- the tie-rod mounting bolts (3),
- the mounting bolts (4) of the side stiffener,
- the radiator mounting lower cross member mounting bolts (5),
- the lower radiator cross member.
II - OPERATION FOR REMOVAL OF PART CONCERNED

- Remove the hydraulic distributor cover mounting bolts (6) (oil may flow out).

- Remove the hydraulic distributor mounting bolts (7).
- Disconnect the hydraulic distributor solenoid valve connectors (8).
REFITTING
I - REFITTING OPERATION FOR PART CONCERNED

- Fit the distributor with its protection plate, centring it using the bolts (4) and (5).
WARNING
Check that the distributor slide is properly engaged with the notched sector lug (9).
- Refit the other bolts on the distributor.
- Tighten to torque and in order the distributor mounting bolts (7.5 Nm).
ADJUSTING THE LEAF SPRING LEVER

- Hold the multifunction switch lever in the end position (first selected) using a hose clip and a bolt (13) in the mechanism housing.
- Remove the bolt (14).
- Fit the locating ball spring by fitting the bearing (10) into the groove (11) for the notched sector (12) corresponding to first selected.
- Fit the locating ball spring bracket mounting bolt (15) without tightening it.
- Fit the (Bvi. 1462) (16) in place of the bolt (14).
- Screw the tool in fully whilst holding the locating ball spring.
- Torque tighten the locating ball spring bracket mounting bolt (9 Nm) (15).
- Remove the (Bvi. 1462).
- Refit the locating ball spring mounting bolt (14).
- Torque tighten the locating ball spring mounting bolt (8 Nm).
- Remove the hose clip and the bolt (13).
- If the oil distributor is replaced, the auto-adapatives must be reset to
zero using command RZ005 " Clear auto-adaptives " and reset the oil age
counter on the automatic transmission computer using the Diagnostic tool,
run command CF074 " Enter date of gearbox oil change ".
After running command RZ005, it is essential to carry out a test drive performing all gear changes, both up and down, several times to store the new values.
- Torque tighten:
- the cover mounting bolts (10 Nm),
- the reinforcement plate mounting bolts (21 Nm).
II - FINAL OPERATION
- Refit:
- the radiator lower cross member,
- the side reinforcement,
- the tie-rod,
- the fan assembly (see Engine cooling fan assembly: Removal - Refitting) (MR 392, 19A, Cooling),
- the bottom cooling hose,
- the cooling hoses at the automatic transmission side,
- the resonator,
- the expansion bottle,
- a new expansion bottle plastic attachment rivet,
- the expansion bottle hose,
- the multifunction switch control cable.
- Connect the modular connector.
- Refit:
- the air filter unit (see Air filter unit: Removal - Refitting) (MR 392, 12A, Fuel mixture),
- the battery tray (see ) (MR 392, 80A, Battery),
- Fill the automatic transmission (see 23A, Automatic gearbox, Automatic gearbox oil: Draining - Filling, 23A-2) (MR 392, 23A, Automatic transmission).
- Refit:
- the engine undertray,
- the front left-hand wheel arch liner (see Front wheel arch liner: Removal - Refitting) (MR 393, 55A, Exterior protection),
- the front left-hand wheel (see Wheel: Removal - Refitting) (MR 392, 35A, Wheels and tyres).
- Connect the battery (see Battery: Removal - Refitting) (MR 392, 80A, Battery).
READ NEXT:
 Flow control solenoid valve: Removal - Refitting
DP0
Do not drain or remove the automatic gearbox in order
to remove the flow control solenoid valve
REMOVAL
I - REMOVAL PREPARATION OPERATION
Place the vehicle on a two-post lift (see 02A, Lifting
Automatic gearbox connector: Removal - Refitting
DP0
REMOVAL
I - REMOVAL PREPARATION OPERATION
Position the vehicle on a two-post lift (see Vehicle:
Towing and lifting) (MR 392, 02A, Lifting equipment).
Shift the selector lever to Neutral.
Dis
Automatic gearbox converter: Removal - Refitting
DP0
REMOVAL
I - REMOVAL PREPARATION OPERATION
Remove the front left-hand wheel arch liner (see
Front wheel arch liner: Removal - Refitting) (MR
393, 55A, Exterior protection).
Remove the resonato
SEE MORE:
Pump assembly: Removal - Refitting
K9K, and JA5
REMOVAL
I - REMOVAL PREPARATION OPERATION
Note:
When replacing the electric pump assembly,
always replace the control relay.
IMPORTANT
Before any operation on the sequential system,
discharge the accumulator using the Diagnostic
tool.
To discharge the accumulator, run command
" Disc
Multimedia equipment
The presence and location of this equipment
depends on the vehicle version.
Multimedia touchscreen;
Multimedia sockets;
Steering column control;
Voice commands;
Microphone.
Refer to the equipment instructions
for information on how to operate
this equipment.
© 2016-2025 Copyright Renault Clio Owners Club
